Exporting and Importing Mailbox Content in Outlook 2010
Exporting Mailbox content to a .pst file
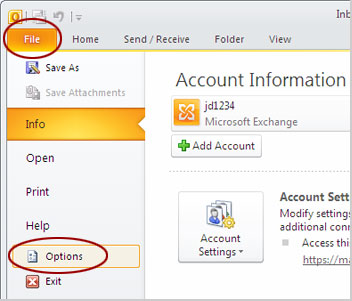
1. With Outlook open, select the File tab in the upper left, then the Options link.
If you are using Outlook 2007, select File - Import and Export, and skip to step 3 below.
If you are using Outlook 2007, select File - Import and Export, and skip to step 3 below.
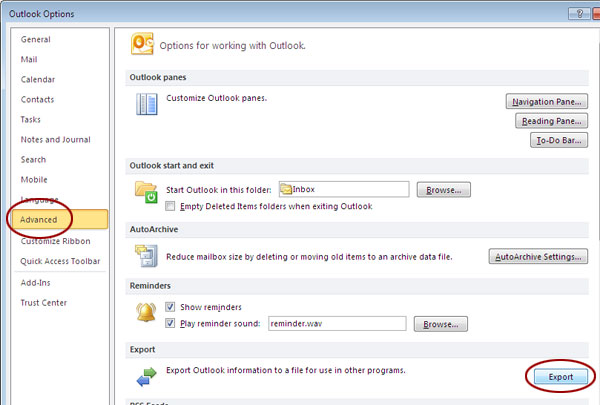
2. In the Outlook Options window that appears, select the Advanced link on the left then theExport button to the lower right.
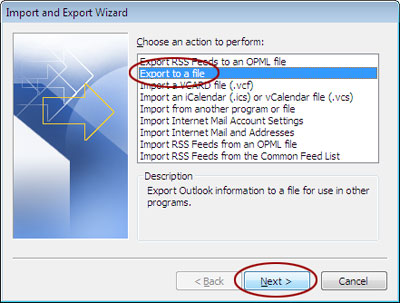
3. In the Import and Export Wizard dialog box, select Export to a file, then select Next.
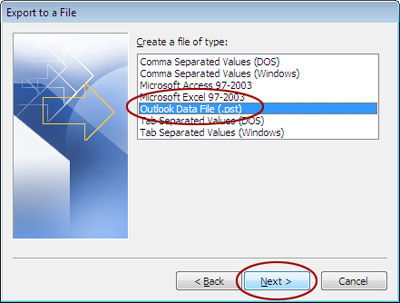
4. In the Export to a File dialog box, select Outlook Data File (.pst), then Next.
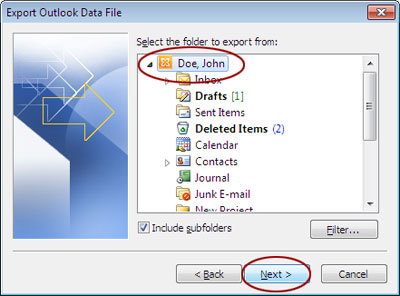
5. In the Export Outlook Data File dialog box, select the desired heading (usually your full name)then select Include sub folders to include all folders for the account. Select the Next button.
NOTE: you may have to use a scroll bar on the right to find your main Mailbox.
NOTE: you may have to use a scroll bar on the right to find your main Mailbox.
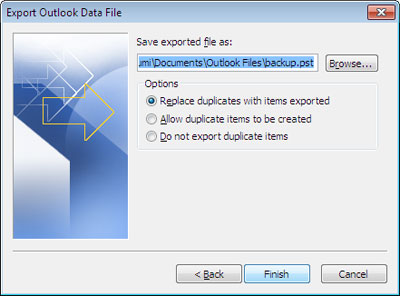
6. At the top of the Export Outlook Data File window, in the Save exported file as field, Outlook names the file "backup.pst" by default and displays the path for saving the file in your computer's Documents folder in a sub folder called Outlook Files. Select Finish to accept these default settings.
Note: Select Browse and to save to a different location on your computer if you prefer, or to rename your .pst file.
Note: Select Browse and to save to a different location on your computer if you prefer, or to rename your .pst file.
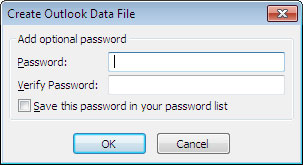
7. A Create Outlook Data File window will appear.In both fields type in a password that will be required when the Personal Folders File is opened. IMPORTANT: If you forget the password there is no way to retrieve it or otherwise open the .pst you are creating; be sure to keep track of any password used here. Select OK to continue.
8. Your computer will pause as the .pst file is created; if you have a lot of items to back up you may see a window that shows the status of each item as it is backed up. No notice will appear to indicate that the back up is done, simply verify that the "backup.pst" file appears in your Documents\Outlook Files folder when Outlook has finished (if you have changed the location and/or name in step 6 above, look for the appropriate file name/location).
Adding and Importing Mailbox content from .pst file
NOTE: Importing a .pst file allows you to merge items into one Mailbox/list of folders. If you would simply like to open the .pst file and be able to view email messages, calendar items, etc. from within Outlook as a separate list of folders, see the instructions immediately below. To import (merge) items into your existing account folders, click here.
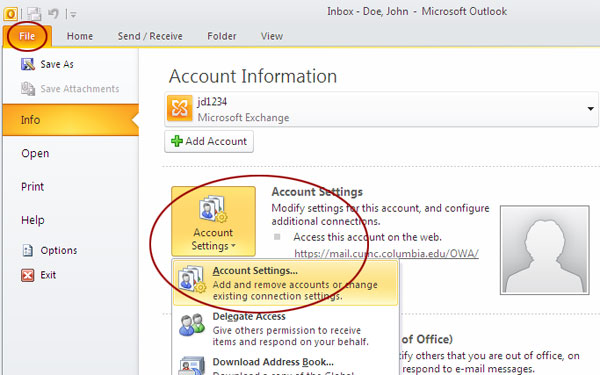
1. In the upper left corner of your main Outlook 2010 window select File - Account Settings thenAccount Settings from the drop down.
If using Outlook 2007, select File - Open - Outlook data file, then skip to step 3 below.
If using Outlook 2007, select File - Open - Outlook data file, then skip to step 3 below.
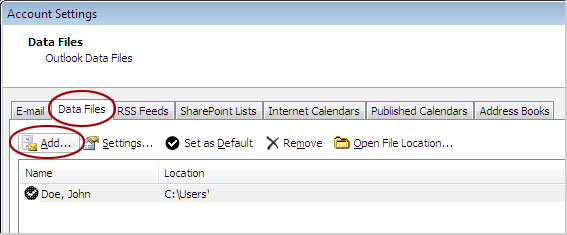
2. In the Account Settings window that appears, select the Data Files tab, then the Add button.
3. Browse to the .pst file on your computer that you would like to open, select it and click OK. The data file will be listed in your Account Settings window.
4. Click the Close button in the lower right corner of the Account Settings window to return to Outlook.
5. The data file items will appear in the left Navigation pane of Outlook; click on the + or - sign to the left of the file's title to expand or collapse the list.
Steps to Import (merge items) from a .pst:
1. With Outlook open, select File - Open - Import in upper left corner.
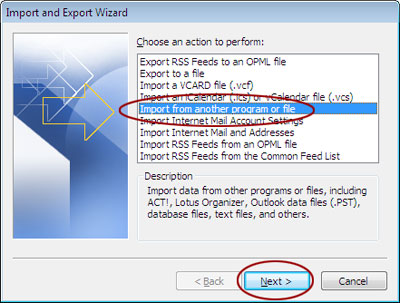
2. From the Import and Export Wizard window select Import from another program or file, then Next.
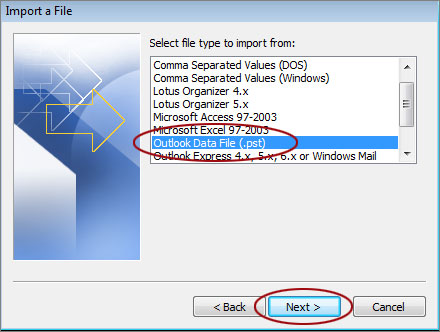
3. In the next window select Outlook Data File (.pst), then Next. You may need to use the scroll bar on the right to find this option.
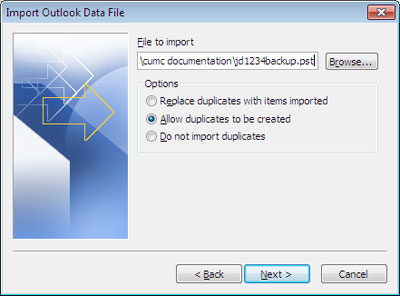
4. In the Import Personal Folders window, select Browse and locate your desired .pst file, then select the Next button. If a password was set on the .pst file when it was first exported, you will be prompted to type in that password.
NOTE: The three Options in this window allow you to change what will happen with any duplicate items (email messages, calendar appointments, tasks, etc.) that may exist if you are importing into an existing list of folders. If you are not sure about duplicates, select the second option, Allow duplicates to be created, to be safe.
NOTE: The three Options in this window allow you to change what will happen with any duplicate items (email messages, calendar appointments, tasks, etc.) that may exist if you are importing into an existing list of folders. If you are not sure about duplicates, select the second option, Allow duplicates to be created, to be safe.
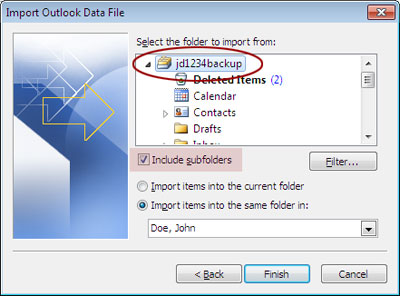
5. At the next window, make sure that the topmost heading of the Outlook Data File is selected, and that the Include Sub folders box is checked to include all items from the .pst file during the import.
6. Leave the default Import location selected, Import items into the same folder in: <User Name>, to merge email messages, tasks, etc. into the same folders of your current Outlook profile. Select Finish.
7. Outlook imports the email, appointments, tasks, etc. into your current profile.
For more tutorials and help using Outlook data files, please see:
http://office.microsoft.com/en-us/outlook-help/CH010371340.aspx
http://office.microsoft.com/en-us/outlook-help/CH010371340.aspx

